-1.png?width=400&height=99&name=MicrosoftTeams-image%20(18)-1.png)
The following is demonstrated using screenshots from a Macbook. Please keep in mind that WorkerSafety Pro on a PC will look nearly identical to these screenshots.
Starting a required check-in.
A supervisor or admin will need to configure the required check-in settings on the Workforce Safety Portal to enable that functionality in the WorkerSafety Pro app.
1. Log in to the Workforce Safety Portal by visiting https://safetyportal.becklar.com/dashboard
2. Click "Admin Settings," then click "Check-Ins"

3. Click on the button to toggle "Required Check-Ins" on. Then click on the drop-down arrow to select the Required Check-In interval.

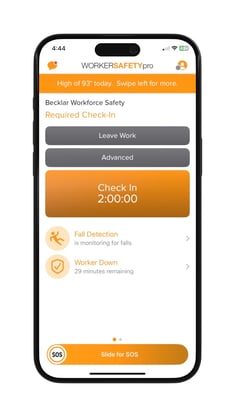
4. In the example below, the admin has selected a 2-hour interval .

5. Click the drop-down arrow under "Sub-org Customization" and select "Locked- Sub-org Customization Disabled" if you want orgs/teams under the org for which you are creating the required check-in also to have the same required check-in. If not, select "Unlocked- Sub-org Customization Enabled" if you want sub-orgs/teams to be able to set their own Required Check-ins (In this example, the admin has selected "Locked- Sub-org Customization Disabled")


6. Click “Save” to set the required check-in.

7. On the WorkerSafety Pro app, you will see a required check-in set. When you tap “Start Work” a check-in timer will begin based on the hourly interval the admin previously set.
Please note that each time you tap on the check-in timer, it will be reset.
Next Steps
Now that you've learned about required check-ins, you may want to learn about fall detection. Click here to view the article.